Tuesday, April 24, 2012

Veggie Garden Beds 2-4

     My insanity cruise has sailed to new horizons! I have now finally finished the last three beds. I wanted to get them all done and planted before the end of April. Mission accomplished! Yippee! So I did the same thing as before and built the beds in the same manner and beds 2 and 3 are completely planted and bed 4 is half way planted. I'm leaving room for some carrots, other root veggies and a pumpkin which needs to be planted in June if you want it in October, so I learned at my local nursery.
     I also planted Asparagus! I wasn't going to because I was under the impression that they took almost 2 years for them to come up (remember, "temporary living situation"). I didn't want to leave them there. But as my best friend and I were at the nursery a gentleman that was there set us straight. He told us if I plant now I will have asparagus by February. And they just keep coming back. He planted his 5 years ago and he gets a crop every year! So instead of putting them in the ground I put them in a giant portable plastic bucket. Big enough or the roots to spread and grow. I will post pics of that soon.

Even the dog lent a helping paw

She tried to help mommy dig holes for the plants

Instead she dug a hole to sit in out of the sun and in a cool place.

I also added mulch in between the beds and am thinking of adding it all around.

Here's a pic of all the beds, and me planting. Yes they are a bit crooked. I had to do that because of some huge roots underground  from an old ficus tree that used to be there. They were too big to cut or dig out, so I went around. Imagine how short or crooked my carrots could be. Ugh! 

Thursday, April 19, 2012

Vegetable Garden Project

Have I lost my mind? Well, quite possibly. As I mentioned in an earlier post, I might have had a spontaneous concussion which has led me to have an obsessive need to plant a vegetable garden. Maybe in the fantasy world in my head it looked easy and quite satisfying. It's time to find out. I have embarked on this possibly insane journey but I have made up my mind to see it through until the end...even if it almost kills me! Although I've never heard of death by planting a garden. Unless my garden turns into some kind of horror movie. Ha-ha.
     So I started by building raised garden beds. Since my gardening time is so limited I decided to do one at a time. That is, dig and weed, build one, plant in it, and then go to the next one. I figured I wanted four beds but if I only got two or three done at least something would get planted. Now the growing...well that's another story. I don't really have much experience in gardening. Really, I'm a beginner. Aside from herbs in pots and the occasional fern, I have never had my own vegetable garden. My mom had one growing up and my dad worked in agriculture for many years, so I would like to think something rubbed off. When I was young my dad and I would be driving down a road and he would quiz me on what veggie was growing in the fields. I got really good at identifying each one just at a glance in a moving car. But that was years ago. And I didn't plant them.
     I did some research online and everything suggested I make a list of what I want to plant and also a plan of my to-be garden. It was a good idea. So I measured the area I wanted to plant in and drew up a plan. Given that I went to Interior Design school it was easy to draw up. But if you don't have that experience, measure the space and just draw some boxes in. That was done, so now the real work.
     First let me explain the method to my madness...I wanted beds that were 4'x8' and portable (since this is a temporary living situation I'd like to be able to take them with me when I move). I went to Lowe's and bought 3-2x8x8 Green Douglas Fir boards. I had one cut in half (4').  I opted for the Douglas Fir because my local store didn't have Cedar. The "Green" means that it has not been treated with any chemical which can leach into the soil and subsequently into the veggies. I think it will last long enough since Southern California has a basically mild climate.
     The whole back yard was filled with weeds. After about two weeks of watering to soften the soil I got to digging and weeding the area. Whew! Talk about a workout! I did patch by patch. Once I had the area dug up, soil loose and weeded, I put in my boards. This was a bit hard, trying to get them straight and level, but I did. Now, I didn't put brackets, screws or nails to hold the beds together (remember, portability) but I may put some corner brackets or L-brackets on later. They seem to be sturdy enough now. I would recommend that you do put brackets if you plan on keeping the beds in the same place for a long time.
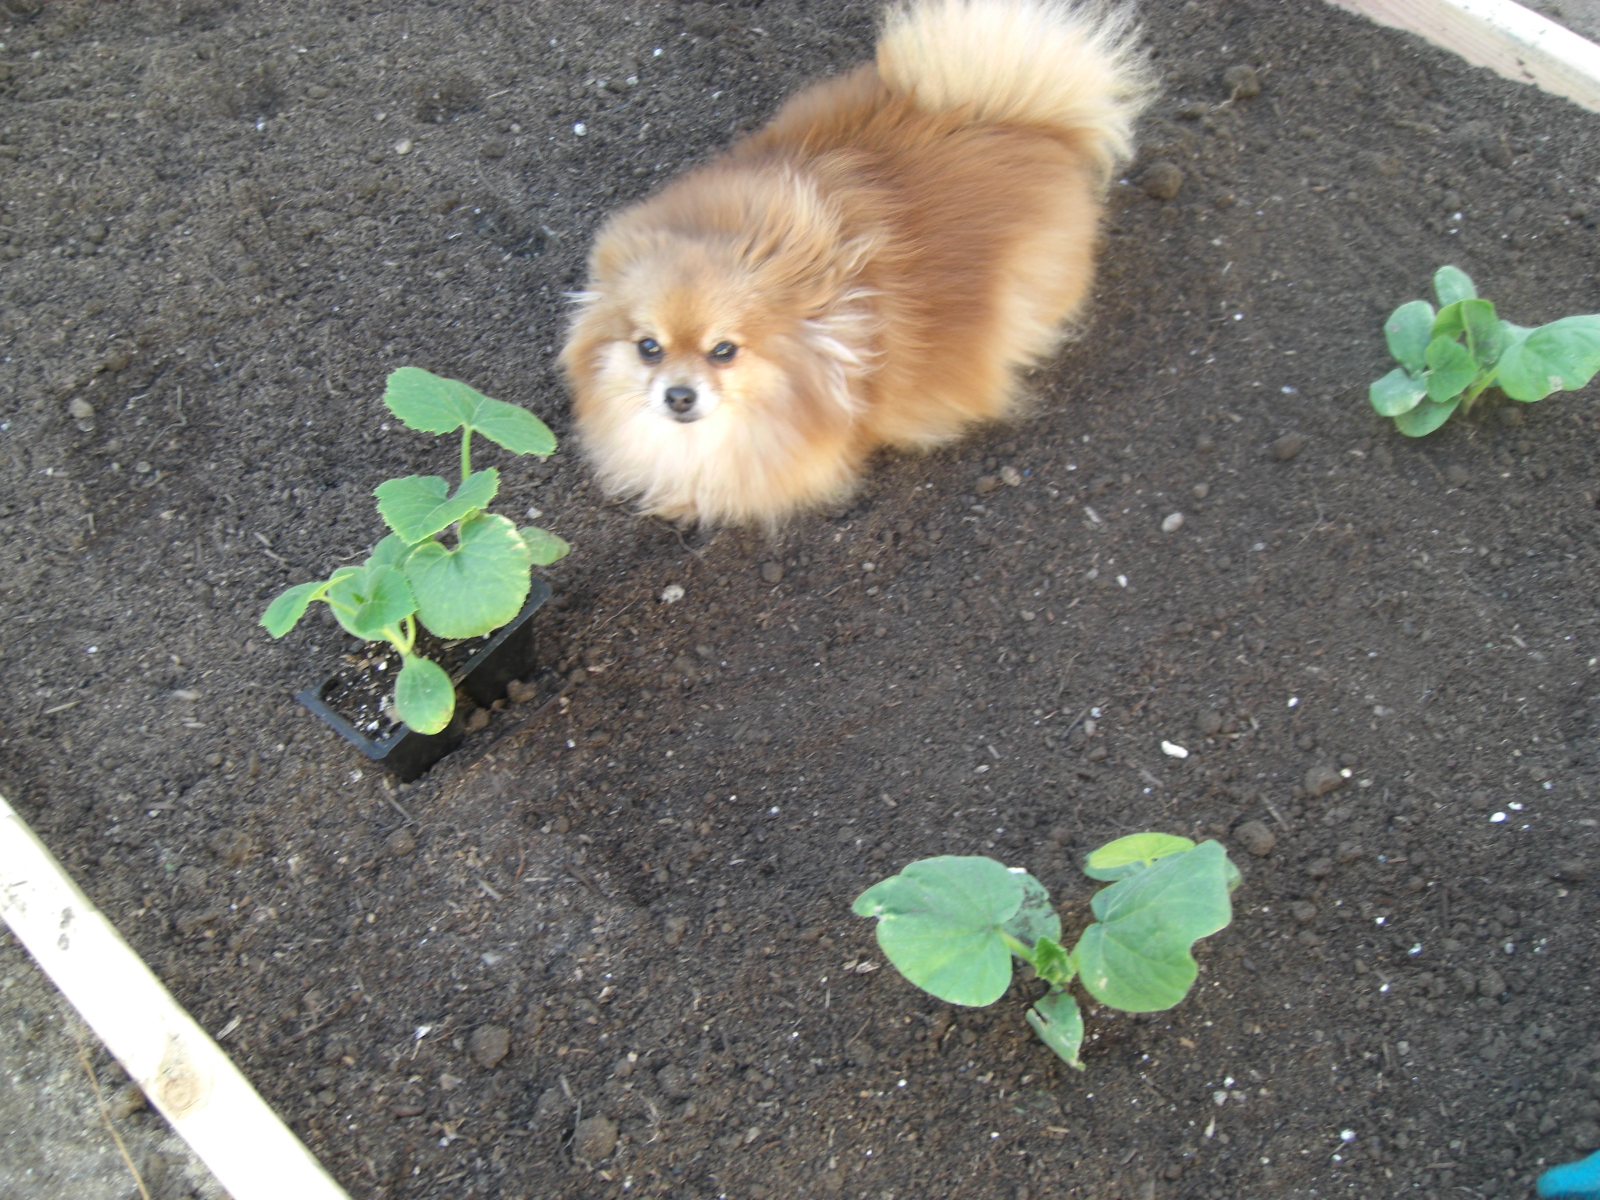
     Once the boards were in I added a bag of soil booster (a soil that has compost and nutrients added to it).   I used GreenAll , since I'm going organic. Luckily my soil already had a good mix of sand and clay and what seemed like a bit of mulch in places. The amendment can only make it better. Once it was nice and mixed in I got to planting! That was fun. I carefully planted everything I wanted in that bed and watered. Presto! 3 hours later, I had ONE raised bed...only three more to go...sigh! If this doesn't work out, I can always start my own chain gang.

The Plan

Dig a trench wide and deep enough to fit board.


Put your brackets where the boards meet to hold the frame sturdy
I chose to omit the brackets in order to keep it portable. I may still add them later if i feel it necessary.


Add your Soil Booster if needed and mix well then level the soil.


Now you can start planting your plants!


Here's a pic of my first bed and what I planted in it.


Monday, April 16, 2012

Herb Garden

   
      I started off with an easy planting job. I've been wanting to plant herbs for a while. Since our last place. I hadn't had a chance and then we moved. So I was looking at the big back patio and found a nice place for the herbs. I had to get all the herbs since all died previously. It was probably a good thing since it made the moving of all those pots so easy. The universe knew.
     So I went to the local nursery and picked up herbs and organic soil and got to work. This was easy since some of the pots still had a little bit of soil in them. And since there wasn't any major digging involved, it only took about an hour. From putting them in pots to arranging them where I wanted them. I found a great spot between sliding glass doors. Our place has one from the kitchen and another in my roommates room which is only about 8-10 feet from the other. It's the perfect spot with enough sun and right outside the kitchen when I need them.
     Every time I go outside they are right there. They seem to have taken well to the pots and are happy. If you don't want to do anything big, this is the perfect start. Not only will you be gardening but you will immediately be able to enjoy the fresh herbs. If you enjoy cooking like I do, but don't want to maintain a whole garden, then an herb garden is for you.
     A few things to remember is to make sure your pots are big enough so your herbs have room to grow. They don't have to be giant but a bit bigger than the plant itself. Enough for the roots to have room to spread. Then make sure that the pots have a hole at the bottom or some type of drainage. I like to buy a small bag of small rocks or pebbles and I put some inside the bottom of the pot before filling with soil. This helps the water to drain and it doesn't end up at the bottom and rot the roots. You can also use shards from a broken terracotta pot. Add your potting soil to about 1"-2" from rim, dig a hole big enough to fit herb from nursery plastic holder and put in hole and cover with soil. Pat down firmly and then water. If you are doing several herb pots, water all at once when you are finished potting them all. And there you have it, an herb garden! So if your not really a gardener this is the perfect jumping off point. Go on, be a Domestic-Genius... start your own herb garden...you can do it.


Dill
Oregano
Basil
Thyme
Parsley
Cilantro
Tarragon
Mint
Rosemary
Chives
Sage

Monday, April 9, 2012

Spring Has Sprung!

      Every year in the Spring gardeners all over the country begin their yearly ritual. From East to West, North to South they begin the arduous task of prepping their gardens for Spring planting. I too have now joined the club. This year I have made the possibly crazy decision to plant a garden. I've grown herbs before...I keep thinking to myself. Possibly at some point this winter I bumped my head on something, or maybe the awful food poisoning from last August left a residue that has moved its way to the decision-making part of my brain. Not sure which but I'm doing it! I've always wanted a veggie garden. So here we go.
     In order to take this project all the way I have done some research. Yes, I am one of those people that researches the heck out of something in order to try to get it as right as possible. And now that I'm blogging I feel I should really try my best to succeed, especially if I'm giving advice to others. That's not to say that trial and error isn't good. With failure comes success.
     My prepping has been pretty involved considering the back yard has been like a deserted island for so long. There is an avocado tree and a lemon tree that are holding on for dear life back there and weeds about three feet tall. Apparently someone thought that that plants could survive with the rain water we get!!! Mind you that we usually don't get much rainfall in our area. So I've been trying to help the two trees out and weeding, which took two weeks of watering alone to soften the soil enough to get the shovel in! So I decided to only weed where in need the room. I will do the rest later when I have more time.
     The plan is to build some raised beds and add some amendments to the current soil and plant in the beds as to keep everything level and draining better. The beds will be 4' by 8'. I feel that 3-4 beds should be enough. I don't need a big crop nor do I have the room. I plan to plant about 4-6 plants of each vegetable in case one or two die off. I'm not planning on using seeds for everything (some things you have to like carrots ) since I tend to be somewhat impatient. I do plan on going organic though and will stay as true to that as possible.
     So you all get to embark on this journey and let's hope for the best. I really hope everything stays alive or I will have proven that not only researching something doesn't mean you will have a green thumb, but that I might have seriously bumped my head at an earlier date and still have a concussion or permanent damage. I will be chronicling the whole process and keep everyone up to date periodically including pictures. Wish me luck everyone.

Here is a view of the weeds! The rainfall sure did help them grow!

 Okay, so I'm not quite sure what that bald spot is.                                Hopefully not a body of some kind, ha-ha.

WEEDS! Uck.


Tuesday, January 24, 2012

The Move

     Well hello everyone. I know it's been a few months. I've been moving. My boyfriend and I moved in to a friend's house to help her financially. It was also a great opportunity for us to move out of where we were and save some money ourselves. It's a temporary move, about 2 years or so. Economically it will help both parties and we will all be able to pay off some debts and save.
     My friends house has a lot of work to be done. She had been taking care of her mother who suffered from Alzheimer's/Dementia until March of last year. She also cares for her handicap brother, although he is high functioning he still needs her. That is the sad part of all this, her losing her mother. As time has passed the house has been neglected. One thing or another hasn't been done. Not that it's in shambles and about to fall down, but little things like paint, organization, the yard and other small things. What does this mean for myself and all of you? Projects! That's the exciting part.
     It took us all month long to move in and get settled because the house is so cluttered with STUFF! I'm just starting on the decorating of the bedroom. It's huge. I feel like I have a studio apt upstairs. Here is a little about the house. It was a 3 bedroom, 2&1/2 bath, living room, family room and kitchen originally. There is a sitting room next to the master suite (our room) with a big balcony that extends the length of both rooms. Downstairs, under the balcony they had an enclosed patio that was later made into a big bedroom (my friends room). The sitting room was made into a bedroom also, although this is a mystery to me as to why, since it wasn't necessary. The downstairs 1/2 bath was also turned into a full bath. The front and back yards both need help and garage needs to be uncluttered.
     So back to the projects, there are many to come. We will start with the master bedroom. I've got some fun design ideas and some simple "Genius" projects to give a room some WOW! Projects, pictures and articles coming soon!

Tuesday, November 15, 2011

It's Getting Cold

     The Mercury has finally dropped...a bit! It doesn't really get cold here in Southern California. At least not by East Coast, Mid West or even Northern California standards. But tonight it is a cool 51 degrees. I wait all year long for it to cool down. As I said in an earlier post, the last three months of the year are my favorite.  Every year I pray that a freak storm system will bring us a dusting of snow, but to my disappointment, nothing. One year it did get close, Malibu Canyon (about 30 minutes from me) got some snow. Well, it was all over the news. Even friends from back east were stunned and called asking what was happening. It was so beautiful. Maybe this year.
     I always wait anxiously for the colder weather so I can pile on the "winter clothes". Scarves, hats/beanies,
ponchos, sweaters, gloves, socks...in cashmere, wool, angora...so nice, so warm. I love layering clothing. So in order to celebrate my love of the cold I wanted to share some pictures of my friend Cheryl's knitting projects. She has been knitting for about a little over a year now and I find that her work is pretty good. I cannot believe that she has gone from novice to this so quickly. I have been knitting for years and I still only do knit-purl-knit-purl...(not that I have taken a class like her) I think she has found her calling. And to top it off, she enjoys it. I don't exactly have the patience it takes to knit the same thing for more than maybe a couple of days. This obviously narrows my choices significantly. I don't think I will be knitting an afghan any time soon. So I say "good for you Cheryl!"
     It all started with a beanie she made me. I just loved it. So I asked her if she would send me some pictures of the other things she has made. Beautiful! Of course she is her own worst critic, feeling that her end product was less superior than expected. I beg to differ my dear friend. I think they are fabulous.
     The pictures of her creations are below. If you are an aspiring knitter you can find patterns for many of these and other projects on many website or blogs. You can also find patterns on Etsy.com but you have to purchase them. Some sites offer free patterns. Good luck and may we all be Domestic Geniuses.


Cheryl wearing one of her creations

My beanie. Love the colors. The combinations of the two blues
and flecks of neutral makes it can be worn with anything...like
 a pair of jeans

Finger-less Gloves
They are all the rage. She made these from the
same yarn as my beanie. I'm still trying to find
 a way to get my hands on them.

Just a simple scarf.

What a great scarf. Simple, beautiful winter
color and cable knit! Need I say more?
     

Tuesday, November 1, 2011

Halloween Costume

          So about a week ago I made a Halloween costume for my friend Tiana. She is in Roller Derby and they asked everyone to dress up in togas. Well she's not one of those girls that just wraps a sheet around herself. So off to Joanns we went. She wanted a hot pink one (the colors of her team are pink and black). So be it. That fabric was hard to work with (it was that stretchy costume material. It was pretty easy. Straight stitching, two pattern pieces, some elastic, gold rope and decorative ribbon.
         So if anyone wants a simple enough costume this is it. The pattern actually makes four different costumes so it's worth it. We actually hit a 40% of sale on fabric and pattern and $5 off our whole order coupon, so it only cost us $35. That included a the thick gold rope instead of thinner one (so it was more) and thin gold rope that she's going to attach to her shoes and wrap up her legs.  We purchased a bit more of everything in case there were any mistakes (just in case I cut something wrong). It could have cost us a bit less but she was okay with it and most costumes at those Halloween stores are going between $50-$70 or more. And don't forget all the accessories you need, it can add up.
          Apparently everyone loved it. Most wrapped a sheet or fabric around themselves and called it a toga. She was happy that she went all out. Everyone thought she bought it. And I had just a bit of fabric left over for some fabric covered bracelets! If anyone wants the pattern number and company just email me. Below are some pictures of the costume.


Okay, so it was more of a sexy toga...it was kind of short.

We tied some of the thicker rope on the shoulder.
Just a simple tie.

More of that thick rope went to the waist.

As you can see we put some of the decorative ribbon on the bottom. A little "Steam  A Seam"and presto! No sewing on that one. We also made the cuffs above the same way. I used the "Steam A Seam" and ironed it onto some extra thick fabric.

Here we used the thinner gold rope for the shoes and wrapped it around her legs.